
Flower Stem
You know that moment when you finish a beautiful origami tulip, hold it up, and realise it is just a head with nothing to stand on? That is exactly the little problem this fold solves. The origami flower stem is one of those quiet supporting models that never gets the spotlight, but every bouquet you will ever make depends on it.
What I like about it is how ordinary the folding feels. There is no tricky base to memorise, no collapse, no sink - just a handful of corners folded into the centre crease, a flip, and then one satisfying outside reverse fold that pops the leaf out at the top. Somewhere in the middle the paper quietly turns from a flat diamond into something slim and stiff, and when you set it down it actually stands up by itself. Fold a few in different greens, pair them with tulips, lilies or any blossom with an opening at the base, and suddenly you are not holding a paper flower any more - you are holding a bunch.

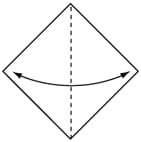
STEP 1. Start with a green square of paper, white side up. Fold it in half, crease and unfold.
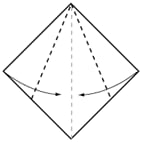
STEP 2. Fold these two opposite corners into the centre crease.
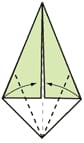
STEP 3. Fold these outer corners to the centre crease.
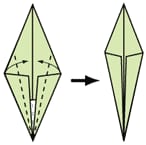
STEP 4. Again, fold the outer corners to the centre crease.
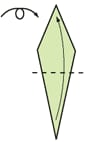
STEP 5. Turn the model over and fold the bottom up to the top corner.
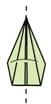
STEP 6. Now fold the model in half.

STEP 7. Crease as shown, on both the front and the back. Then use these creases to outside reverse fold the leaf.

Finished flower stem. This model should stand on its own.
The flower stem can be used with any origami flower that has a hole in its base, such as the tulip. Simply insert the stem into the base of the flower.





